A Simple Guide for Choosing the Right Paper and Pencils Without the Confusion:

A Quick Look at Graphite Pencils
Graphite pencils are made from a mix of graphite and clay. The balance between the two determines how light or dark your pencil marks will be.
You’ll usually see pencils labeled from 9H to 9B:
- H pencils are harder and lighter, precise and fine for details
- B pencils are softer and darker, B pencils as soft and rich for bold, dark shadows
- F pencils sit comfortably in between
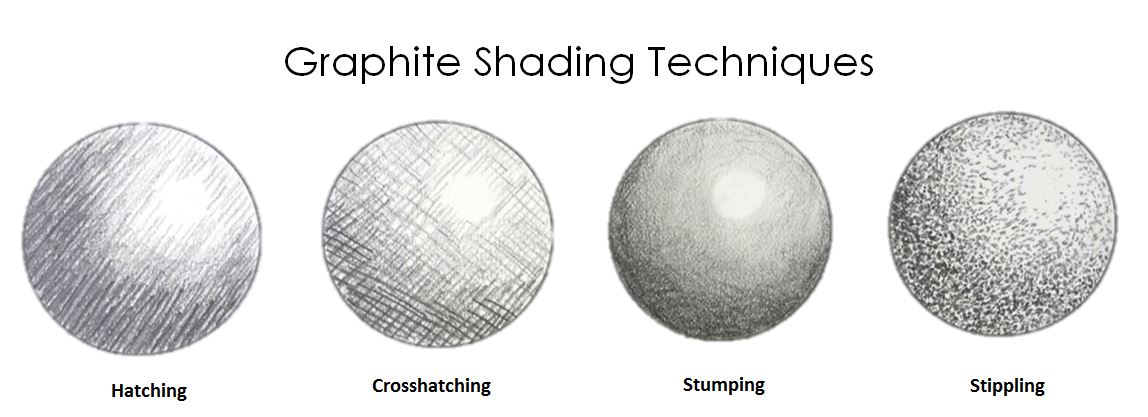
Four Simple Ways to Shade:
Shading is simply the art of building up tone. Here are four foundational techniques, explained simply:
- Hatching: is a technique used to create tonal or shading effects by creating shades/ dark value by drawing parallel lines. The closer the lines, the darker the shade.
- Crosshatching: Creating shades through a series of crisscrossing lines at different angles.
- Stippling: an art technique that creates images, texture, and shading using only small, distinct dots, typically applied with fine-tip pens, markers, or paint. More dots = darker shade.
- Stumping (or Smudging): Is a drawing technique using a finger, cloth, or a blending stump to soften and smooth to smudge and soften graphite.
Why Paper Choice Is So Important:
Shading is about more than making an area darker. It’s how we create depth, softness, mood, and emotion on the page. The type of paper you use affects:
- how dark your shading can go
- how smooth or textured it looks
- how easy it is to control
Smooth Paper: It's great for fine details, but graphite can slide on top, making smooth, even shading a bit tricky.
Textured Paper: This texture grips the graphite, helping you build rich, even layers of shadow with ease.
A Simple Rule of Thumb: For most shading, a medium-textured paper is your most forgiving choice, makes shading easier and more even—especially for beginners. It helps you achieve a beautiful, even tone that feels deep and vibrant.
Your Hands-On Tip: How to Shade Like a Pro
- Hold your pencil at about a 45-degree angle
- Shade with the side of the pencil, not the sharp tip
- Start with light pressure and and gently layer your strokes, moving in different directions
- Press harder or use a softer pencil (like a 4B) for darker areas.
Smooth Paper vs Textured Paper:
Smooth Paper
Smooth paper has very little texture, which makes even shading more difficult.Tips for smooth paper:
- Use soft pencils (2B or softer)
- Create your shade first, then blend using a stump or finger
- You can also rub graphite onto scrap paper and transfer it gently onto your drawing for softer tones
Textured Paper
Textured paper has tiny peaks and valleys that catch graphite more easily.Why artists love it:
- Easier to shade evenly
- Produces deeper, richer tones
- More forgiving for beginners
- Pressing harder or using softer pencils pushes graphite deeper into the paper, creating darker shades. If you want a softer look, blending afterward helps.
The Big Takeaway
Shading becomes easier and more enjoyable when your paper, pencil, and technique work together instead of against each other.
If you’d like to explore this hands-on, CLICK HERE to download the printable shading practice chart. Try printing it on different paper types and notice how each surface responds.There’s no “right” result only discovery.
Your sketchbook is a place to explore, not to be perfect. And every mark you make is part of learning how you express yourself best
Happy Drawing!